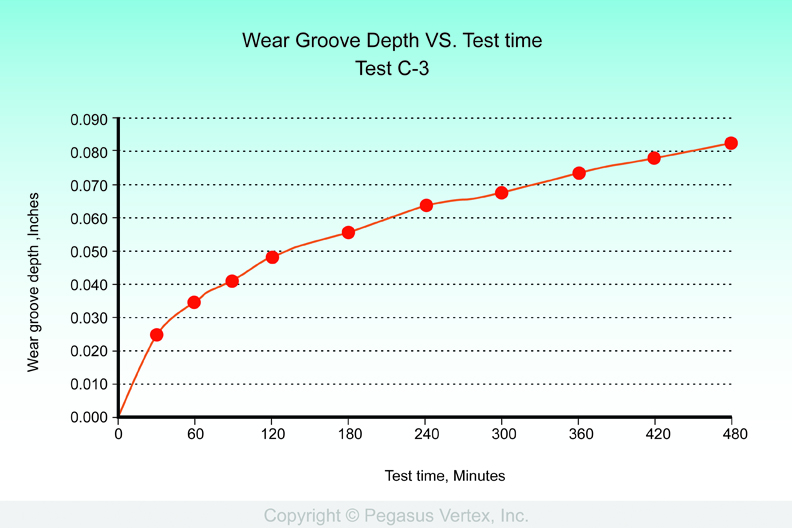
Plotting the depth of the casing wear groove during the 8 hour casing wear test results in a plot as shown in Figure 1. These results are from casing wear test C-3. In this test, the casing sample was a piece of 9 5/8 inch, 47 lb/ft, N-80 casing. The tool joint was fabricated from AISI 4145 steel. And the drilling fluid was a 10 ppg, water-based mud containing 7 % by volume Clemtex #5 sand.
This plot is a description of the performance of a casing wear system under the particular set of operating conditions imposed during the casing wear test. It describes the performance of the casing wear system under the operating conditions of the casing wear test. It does not explain anything!
An empirical curve fit to this data, which is the best representative of all 450 or so casing wear tests, is a function, shown in Equation 1, which is primarily exponential with a bit of a power law element added.
Where h = wear groove depth, inches
D, E, and F are all positive constants determined by the least squares fit to the test data.
t = elapsed test time, hours.
There is a very important and significant consequence of this result: As time, t, increases, the wear depth, h, approaches asymptotically the value D.
The Wear groove depth does not increase beyond D.
And the test time, t90, required to achieve 90% of this wear depth limit is given by Equation 2.
For test C-3, D, (the wear groove depth limit) = 0.17154 inches, and t90, (the test time required to reach 90% of this depth limit) = 98.32 hours.
In those cases where D, the casing wear depth limit, is greater than the wall thickness of the casing, (0.472 inch for the casing sample in test # C-3 ), it can be assumed that the casing wear groove depth will easily reduce casing wall thickness below which required to maintain adequate burst resistance.
But, if a tool joint hardbanding material can be found for which the value of D from the test data is on the order of 0.02 to 0.03 inch, you have a valuable discovery.
Before marketing any such discovery, hardbanding wear rate, initial cost, and replacement cost must all be evaluated. Economics is a major factor in the development and application of casing friendly devices.
If such small casing wear groove depth limits are a physical reality, the wear depth limit can be a more important property of a hardbanding material than the wear factor, which is based on the wear volume determined at the end of an 8 hour laboratory test.
We need to determine if this concept is real or just a mathematical peculiarity of the statistical curve fit procedure.
This will be our next discussion topic.


