Casing Wear Series - 15: Mud Magnet

A mud magnet is a bar magnet that looks a lot like an elongated brick.

They are installed in the return mud line just upstream of the possum belly and the shale shaker.  Their purpose is to collect steel particles from the mud stream. Once or twice each day, the magnet is retrieved, scraped, and the collected particles washed, weighed, and examined.

From visual examination of the particles retrieved from the mud magnet, the casing wear mechanism can be identified.  The four possible mechanisms are (1) galling, (2) machining, (3) grinding, and (4) polishing.

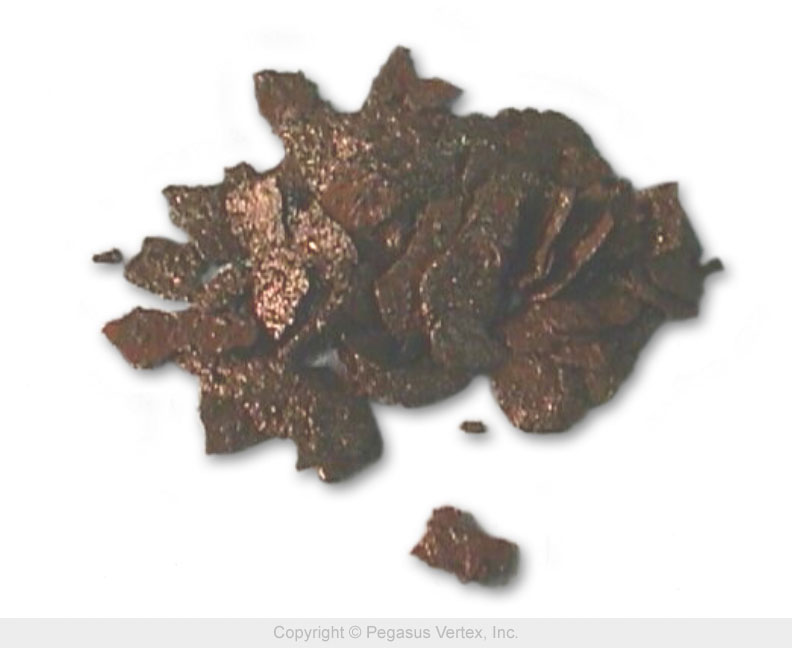
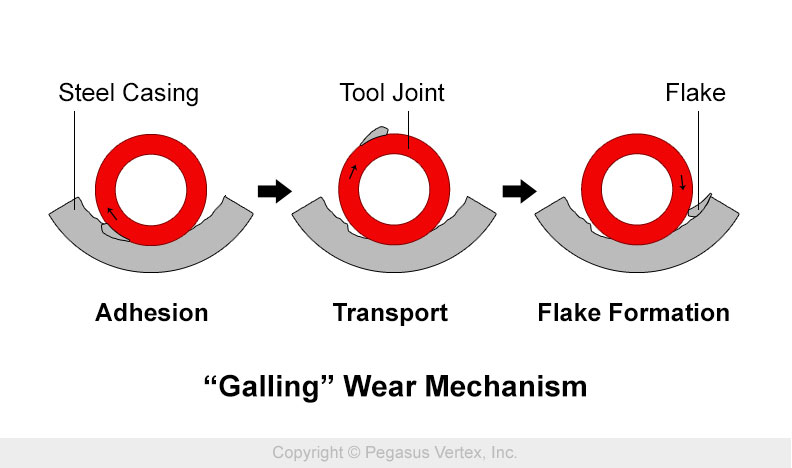
1.  The galling process is shown in Figure 1, and the flakes resulting from this process are shown in Figure 2.  High contact pressure forces the tool joints and casing together in intimate contact.  As the tool joint rotates it is `cold welded’ to the casing.  Further rotation pulls pieces from the casing.  These pieces are later dislodged during further rotation of the tool joint.  This is a very aggressive form of casing wear.

Galling

Figure 1: Galling

Galling

Figure 2: Galling

The flat flakes shown in Figure 2 are typical of the results of galling wear.

If these flat flakes continue for any length of time, you have serious trouble.

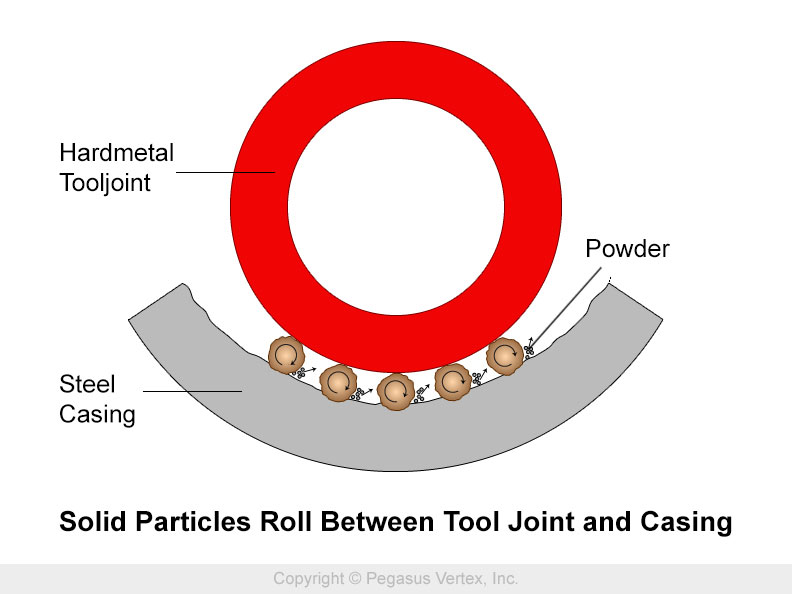
2.  The grinding process is shown in Figure 3, and the particles resulting from this process are shown in Figure 4. Here the drill cuttings (sand) carried by the mud stream roll between the tool joints and casing.  If the contact pressure is high enough, the yield strength of the casing (and sometimes the tool joints) will be exceeded, resulting in surface fracturing of both casing and tool joints.

Grinding

Figure 3: Grinding

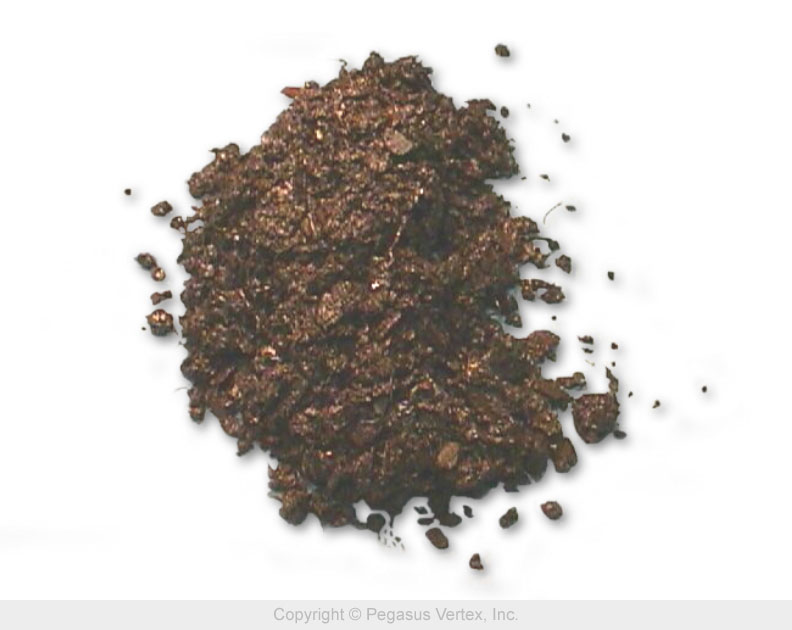
The result of this grinding process, shown in Figure 4, is a metallic powder, varying from coarse to fine.  If you are using `unhardbanded’ steel tool joints, grinding will be the dominant form or casing wear that you will see.

Grinding

Figure 4: Grinding

Judging the significance of the daily weight of material harvested from the mud magnets is a matter of experience.  I know of no way to relate the daily mud magnet collection to the total daily amount worn from the casing.  Sudden increases of grinding debris are a matter of concern.

One thing: check with the on board geologist.  A sudden increase in the volume collected from the mud magnets may be the result of drilling into a formation containing magnetic minerals – probably one of the several iron oxides. (FeO, Fe2O3,  Fe3O4, ….)

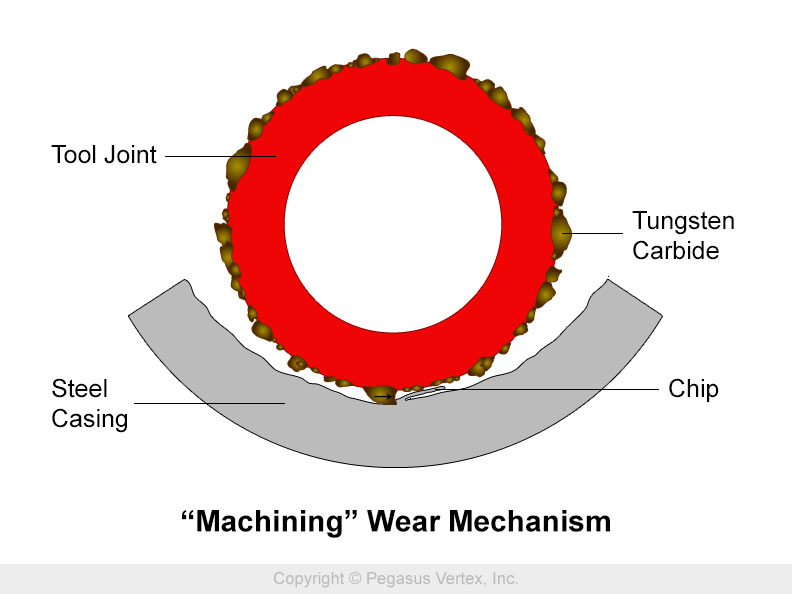
3.  The machining process is shown in Figure 5, and the metallic strings harvested from the mud magnets are shown in Figure 6. This wear results when the tool joints are hardbanded with an alloy containing tungsten carbide particles.  The softer base alloy wears away, leaving the carbide particles exposed.  These particles scrape material from the casing, much as a rasp removes material.

Machining

Figure 5: Machining

Machining

Figure 6: Machining

Carbide hardbanded tool joints are no longer run in casing, although they offer excellent protection for the tool joints.  If cuttings such as these appear in the material harvested from the mud magnets, you have a serious problem.

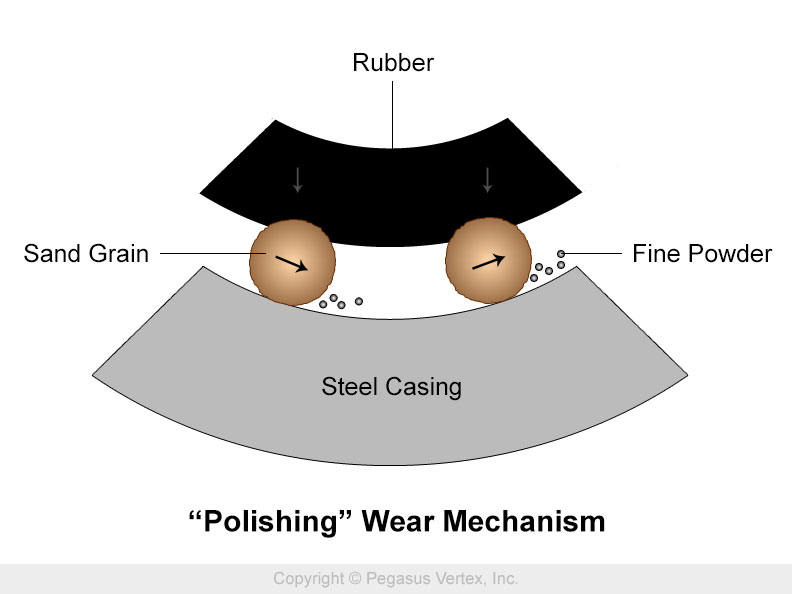
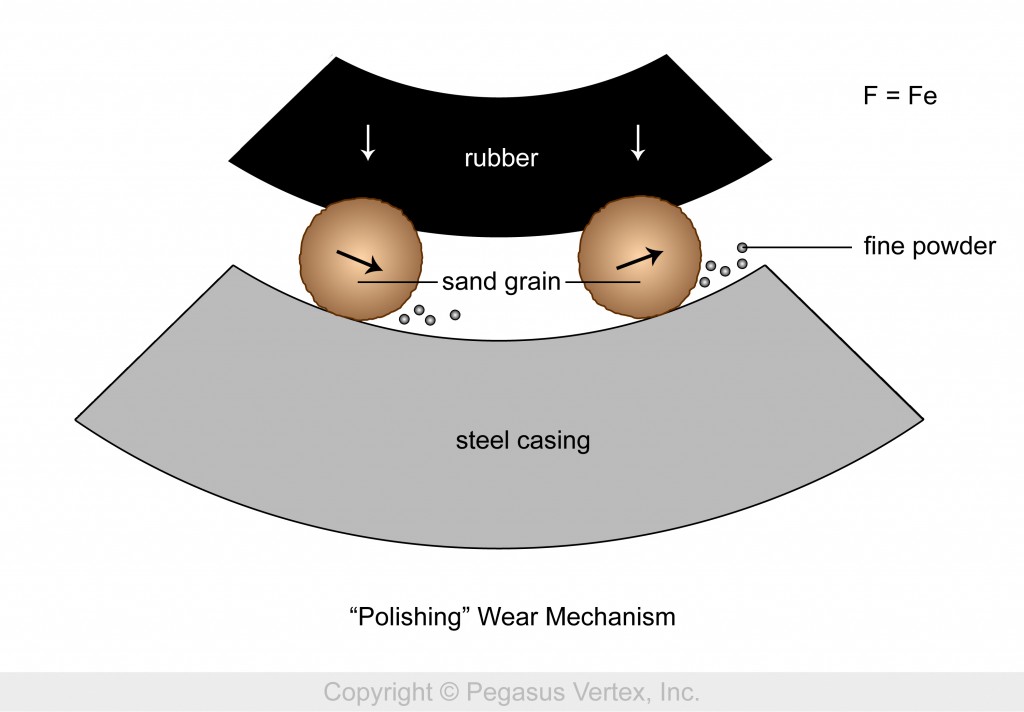
4.  The polishing process is shown in Figure 7.  Here the abrasive particles are imbedded in the surface of an elastic supporting material such as pitch, paper, beeswax or rubber.  This is the process used to erase the results of grinding from an optical surface.  In the oil field, this wear results when rubber pipe protectors are run.  Instead of a wear groove, polishing will result in a mirror finish stripe running axially along the inner wall of the casing.

If you wish to use pipe protectors to protect intermediate casing, it is suggested that the first bit run out of casing be run without the protectors.  This will allow the tool joints to wear away the layer of oxidation and mill scale from the area of the casing where the pipe protectors will contact the inner wall.  If this is not done, the friction factor between the pipe protectors and oxide layer will be so high – 0’5 to 0.8 – that it may be impossible to rotate the drill string.  After the mill scale and oxide layer is removed from the casing, the friction factor between rubber protectors and casing can be as low as 0.1.

Polishing

Figure 7: Polishing

If it weren’t for the chemical and thermal limitations of the rubber protectors, they would be the ideal means to minimize casing wear.

I have no pictures of the very small metallic particles which result from the polishing process. They are similar to the grinding debris shown in Figure 4, but much smaller.

Casing Wear Series - 14: Interpreting and Applying CWPRO Results

With the results of the directional survey added to the drilling program covering the measured depth interval from intermediate casing seat to the next casing point, you have enough information to run CWPRO and to determine the significance of the results. Casing wear analysis run at this time will allow you to spotlight possible wear problems in time to take proactive remedial action.

I have employed a procedure which determines the location and estimates the seriousness of potential casing wear problems. A sample of the significant data from such a procedure is shown in Figure 1 and 2. The procedure is as follows.

Run CWPRO with 3 different wear factors, such as, in this example, 0.5, 5.0 and 10.0. This will cover the normal range to be expected from steel tool joints and steel casing running in an unweighted water based drilling fluid.

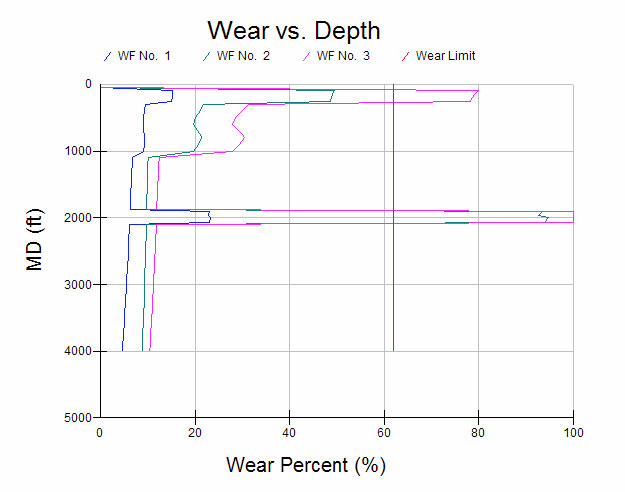
Looking at the three casing wear vs. measured depth plots, the highest casing wear values occur at about 2,000 ft. measured depth.

Casing Wear for Various Wear Factors

Figure 1: Casing Wear for Various Wear Factors

Critical Casing Wear Values

Figure 2: Critical Casing Wear Values

If there was no excessive casing wear associated with the wear factor = 10.0, you probably will have no problems.

However, in the example shown in Figure 1 and 2, casing wear associated with a wear factor of 10 is drastic.

Since WF 10.0 is at the upper end of expected wear factors associated with steel casing and tool joints running in unweighted water based mud, and since there is excessive (disastrous !) casing wear associated with the wear factor = 10.0, you must look at the casing wear predicted for the wear factor = 5.0, and hope that the results are more favorable.

If there is no excessive casing wear associated with the wear factor = 5.0, you probably have no problems, but proceed with caution.

What is ‘excessive casing wear’? This you should decide before you run the casing wear analysis.

The casing wear predicted for the wear factor = 5.0 is 94.7%. This is undoubtedly ‘excessive’.

Therefore, you look at the casing wear predicted for the wear factor = 0.5. This is about the smallest wear factor that you can expect from proprietary tool joints and steel casing run in an unweighted water based drilling fluid.

  1. Add lubricant to water based mud;
  2. Install proprietary hardbanding on tool joints;
  3. Consider using rubber pipe protectors; and/or
  4. Use downhole motors. (This reduces total drillstring rotations. This doesn’t reduce the wear rate, but it does reduce the total wear volume.)

If there is excessive casing wear associated with the small wear factor = 0.5, you need to consider drastic means to reduce the rate of casing wear.  Means to be considered are # 3 and #4 from the list above. At this time, I know of no proprietary hardbanding (#2 on the list) that is associated with a wear factor less than 0.5.

In order to execute the above procedure, you must decide what ‘excessive casing wear’ is. Usually, this is based on consideration of acceptable burst and/or collapse values.

For this example, pictured in Fig.1, we arbitrarily define ‘excessive casing wear’ as being greater than 62 %.

Therefore, in the example shown in Fig.1, casing wear at measured depth of 2,000 ft. is ‘excessive’ for the wear factors greater than 0.5.

If you have a reasonable estimate for the wear factor that will apply to the casing wear system you are considering, you might predict casing wear for the following three values of wear factor: (1) half the expected value, (2) the expected value, and (3) twice the expected value of wear factor. This will predict the expected casing wear values bounded by an optimistic and a pessimistic estimate.

For your information, the dogleg severity at measured depth = 2,000 ft. in this example is 6 degrees per 100 ft.

Casing Wear Series - 13: Why Run CWPRO?

There are two obvious reasons for running the casing wear program – CWPRO, which are:

1. To anticipate and then correct possible casing wear problems: and/or

2. As a post mortem analysis to determine `what happened ?’

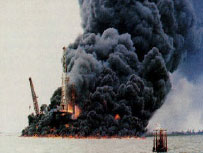
Gusher

Figure 1

What Happened ?

It is far better to anticipate, and then take measures to avoid, the consequences that can result from casing wear. It is also a lot less expensive. If preventive measures are omitted, the following is a sequence of events that can, and have, occurred.


  1. As drilling out of casing proceeds, casing wear reduces the wall thickness of a section of the casing.
  2. The weakened section ruptures due to the differential pressure between the heavyweight mud in the annulus between the casing and the drill pipe and the formation external to the casing.
  3. Drilling mud flows through the casing rupture into the formation.
  4. Fluid level in the annulus drops, reducing the hydrostatic pressure at all points in the annulus and open hole.
  5. The reduced hydrostatic pressure at (or slightly above) the bit decreases to a value less than the formation pressure.
  6. Lightweight formation fluid (oil and gas) can then flow from the formation into the open hole, displacing the heavier weight drilling fluid up and out.
  7. This further reduces hydrostatic pressure in the open hole below the intermediate casing seat, resulting in increased flow rate from the formation into the open hole.
  8. Formation fluids are expelled from the top of the borehole. This is the characteristic `gusher’ shown in so many pictures.
  9. Fairly soon, this `gusher’ can ignite, resulting in a scene similar to that shown in Figure 1.

Therefore, the ideal time to run CWPRO is as soon as possible after the well reaches casing set depth and the results of the directional survey are available. I recommend that you use the raw survey inclination and azimuth data to compute your own values of dogleg severity.

I recommend that you do not accept values of dogleg severity as a function of measured depth that you have not confirmed.

The results of the directional survey are the key ingredients for a casing wear analysis. Everything else is available to be loaded in advance. If you can, get management to authorize 30 ft (or 10 meters) station spacing, rather than the standard (and less expensive) 100 ft (or 30 meter) station spacing, it will give you a more realistic result. As we mentioned earlier in this series, a 3 degree change of borehole direction which takes place uniformly over a 100 foot interval is a lot less liable to produce serious casing wear than is the same 3 degree change which takes place over a 30 ft interval.

So now you have the drillstring specifications, the drilling program from the present casing point to the next casing point – estimated WOB, RPM and ROP values -, and the mud specifications.

What is unknown is the value of the wear factor that applies to your particular casing wear system, unless you have tested the precise casing wear system that will exist in your well. This is quite unlikely.

What we do know are the approximate range of wear factors that apply to various casing wear systems, as listed below:

  1. Steel tool joints, steel casings (regardless of grade), water based mud carrying sand: The wear factors for these systems range from about 3.0 to 10.0.
  2. Steel tool joints, steel casing (regardless of grade), oil based mud carrying sand: The wear factors for these systems range from about 1.0 to 3.0.
  3. Proprietary hardbanding (such as ARNCO 100 XT), steel casing (regardless of grade), water based mud carrying sand: The wear factors for these systems range from about 0.8 to 2.0.
  4. Steel tool joints, X – 80 riser steel, water based mud carrying sand: The wear factor for these systems range from about 30.0 to 50.0.

Now, what do we do with all this information? That comes next.

Casing Wear Series - 12: Dogleg Severity

When determining the casing wear to be expected over an interval of the intermediate casing, the lateral load per unit length of this intermediate casing is the key quantity to be determined. CWPRO uses the dogleg severity and the drillstring tension to make this determination.

If a wellbore changes direction over a given interval of its measured depth, this will result in a lateral load being applied by the tool joints to the casing over this interval. The lateral load per unit length over any given depth interval is proportional to the dogleg severity which applies over that interval.

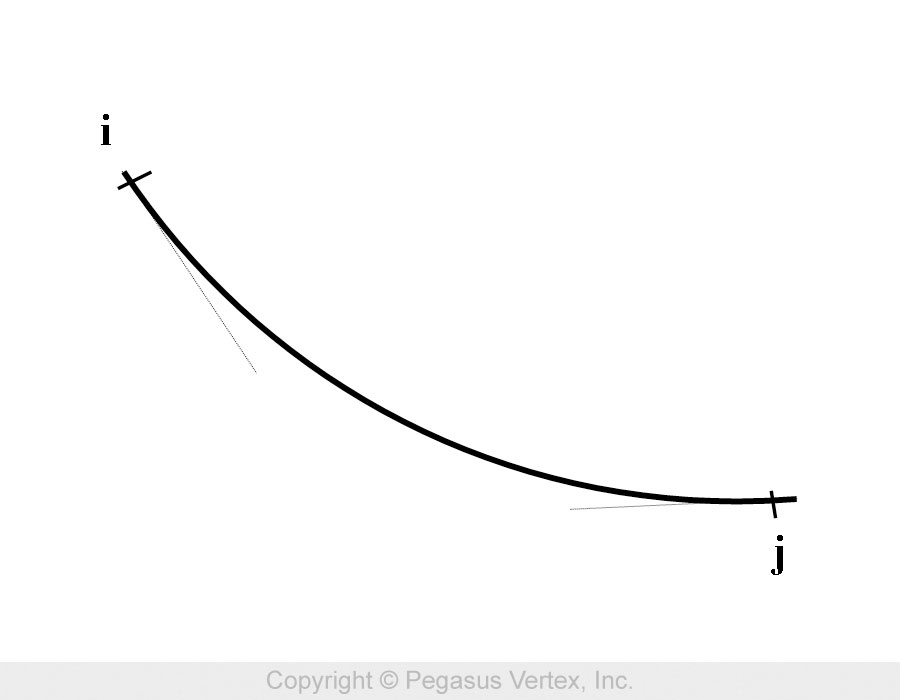
Dogleg severity is determined from the results of the directional survey of the well. In a directional survey, the direction of the wellbore is determined at a series of measuring stations. Using the directions measured at the two ends of a survey interval and the distance between these end points, the wellbore is approximated by a circular arc spanning the distance between these two end points.

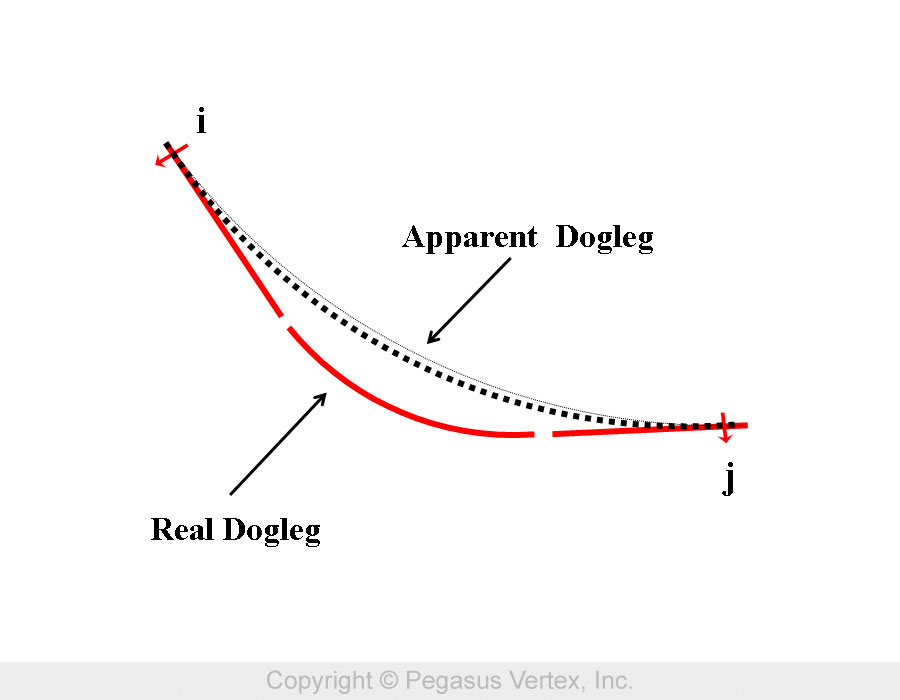
Thus, the apparent dogleg is uniformly distributed over the length of the survey interval, as shown in Figure 1.

Apparent Dogleg

Figure 1: Apparent Dogleg

However, if all of the change of direction occurs within a small sub interval, as shown in Figure 2, the dogleg severity may be much larger than the apparent dogleg computed as though the curvature was uniformly distributed over the directional survey station spacing.

Thus, the use of a station spacing which is considerably longer than the extent of the curved section of the borehole can result in the prediction of a longer interval of casing wear which is considerably smaller than that which actually exists within the sub interval.

So, use closer station spacing. Standard survey station spacing is 100 ft or 30 meters. For high resolution, 30 ft or 10 meters spacing can be used.

It is impractical to set station spacing less than 30 ft, since the statistical uncertainty of the directions measured at the survey stations approaches the magnitude of the angles needed to determine the dogleg severity of the station spacing interval.

Real and Apparent Dogleg

Figure 2: Real and Apparent Dogleg

In the event that a maximum dogleg severity is specified in the well contract, make sure you see the original survey measures, and not a 5 or 7 point running average of the dogleg severities. CWPRO requires original survey measures (inclination and azimuth) as input.

Artificially low values of the dogleg severity as a function of the measured depth in the intermediate casing can result in the prediction of dangerously low values of casing wear.

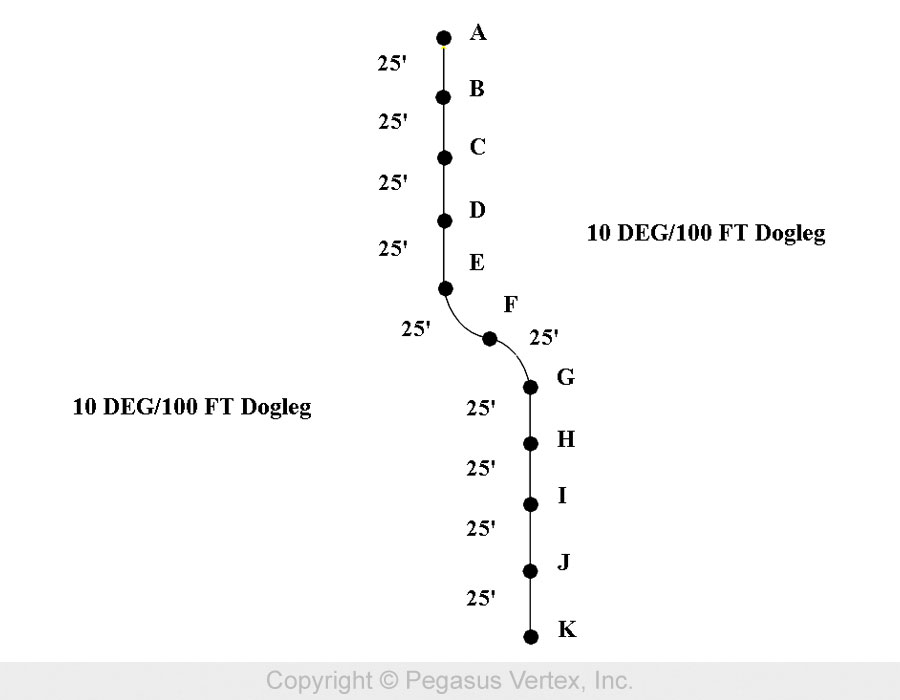
A numerical example of this problem is shown in Figures 3 and 4. Figure 3 pictures an `S’ shaped dogleg, and Figure 4 is a table showing the dogleg severities as determined by a series of measures based on 100 ft. survey station spacing , and the value of dogleg severity that actually exist within the survey intervals.

S - Shaped Dogleg Measurements

Figure 3: S - Shaped Dogleg Measurements

S - Shaped Severity Measurements

Figure 4: S - Shaped Severity Measurements

Casing Wear Series - 11: A Little More About Rubber Pipe Protectors

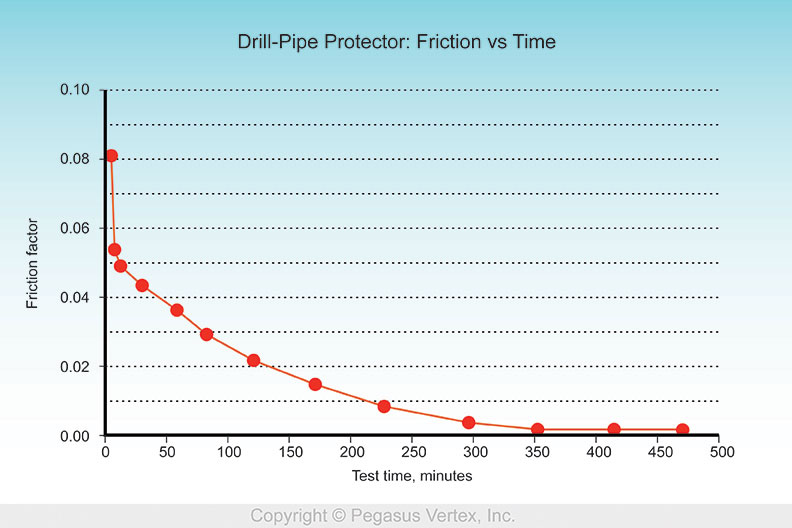
If rubber pipe protectors can be used, they will greatly reduce wear in intermediate casing. However, if they are to be used, it is recommended that they not be run during the first bit run out of casing. Running rubber protectors in newly installed casing, they will encounter high frictional resistance to rotation. This is caused by the layer of mill scale and rust on the surface of the new casing. Until this layer is removed, the coefficient of friction will be very high, and, in some cases, Hade made it impossible to rotate the drill string.

This behavior is pictured in Figure 1.

Drill Pipe Protector Friction VS Time

Figure 1: Drill Pipe Protector Friction VS Time

If analysis of the directional survey and drilling program indicates that casing wear will be a problem, it is recommended that 2 protectors be used on each drill pipe: one on one end of the pipe, and the other at the middle of the pipe.

CWPRO was developed to conduct this analysis. The results of a CWPRO analysis will indicate exactly where and how severely casing wear can be expected.

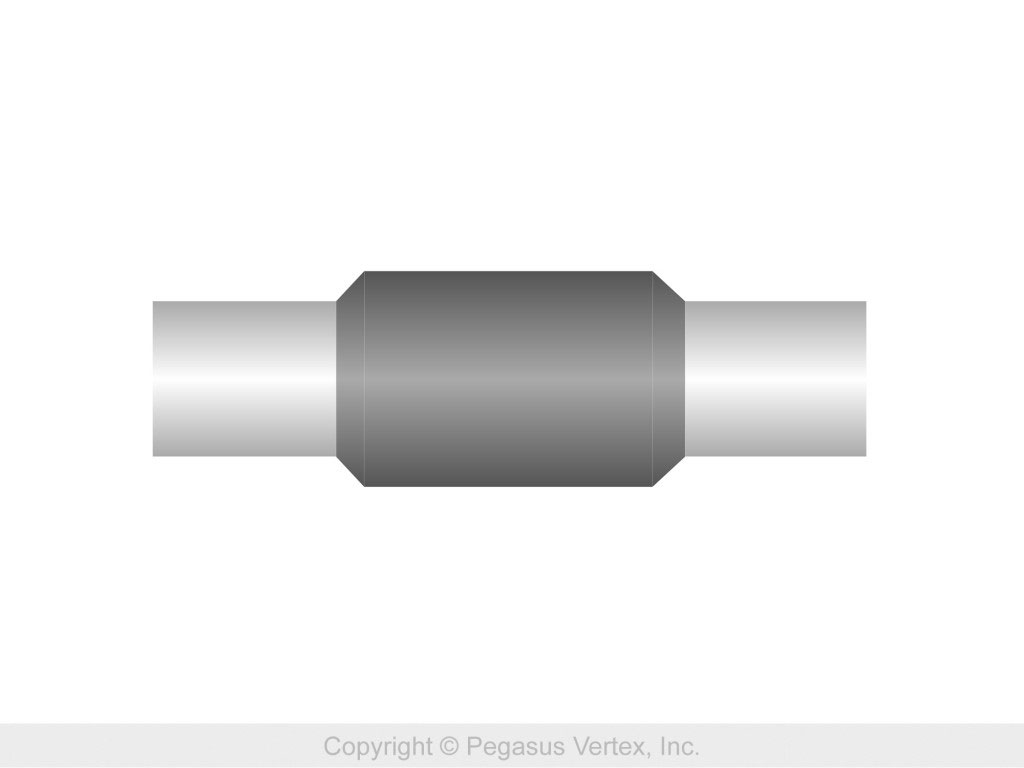
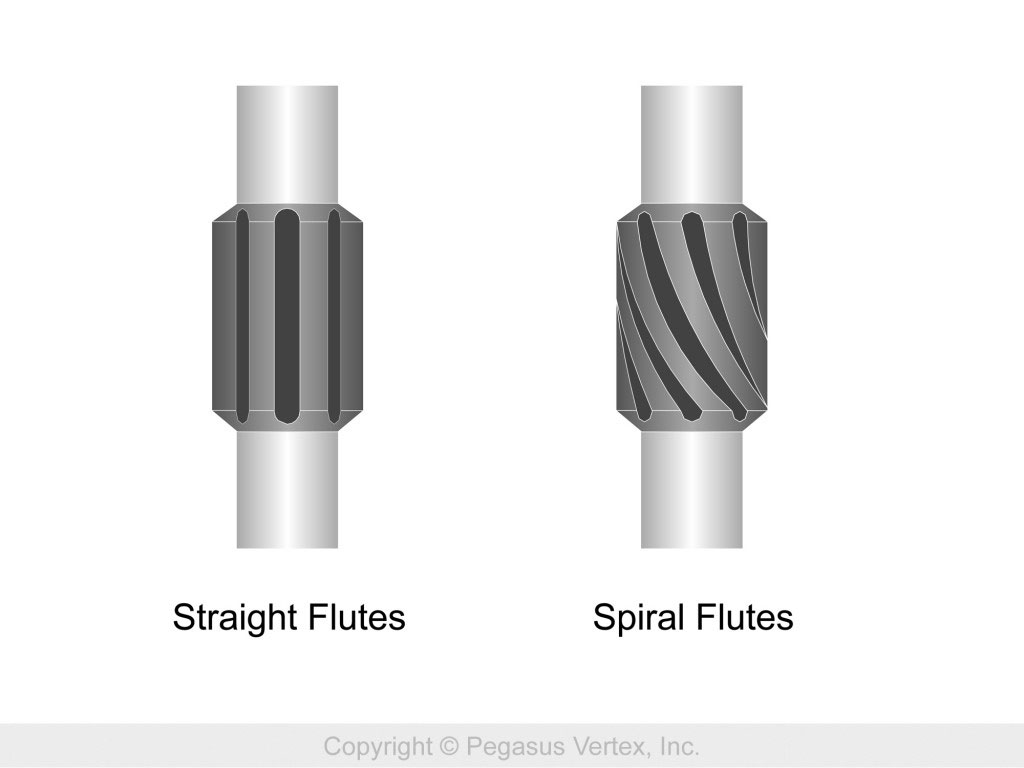
A typical rubber pipe protector is shown in Figure 2. Since these rubber protectors will tend to restrict mud flow up the hole, some manufacturers have cut `flow channels’ in their protectors to reduce their flow resistance. Figure 3 shows two configurations of a `fluted’ protector. The one on the left, with the `straighter’ flutes will offer slightly less flow resistance to the drilling fluid, but will be a source of drillstring vibrations. Therefore, the `spiral fluted’ protector on the right is preferable.

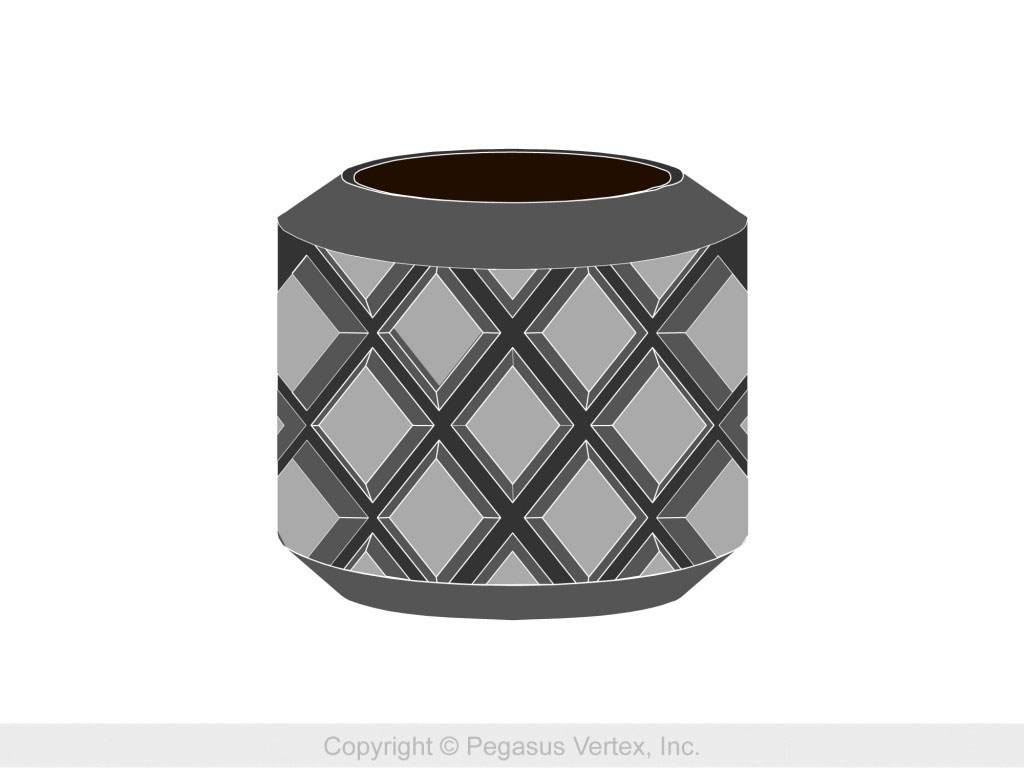
Still better, both from the standpoints of flow resistance and vibration, is the configuration shown in Figure 4. We used to refer to this configuration as our `tractor tire’.

All these drill pipe protectors are clamped to the drill pipe, and rotate with it. Another option is a system where the body of the protector is stationary with respect to the casing. The body of the protector rotates in two end bearings, which are clamped to the drill pipe. This avoids the uncertain friction generated by rotation of the body of the protector with respect to the casing.

Slick Protector

Figure 2: Slick Protector

Fluted Protector

Figure 3: Fluted Protector

Hydril Diamond Type Protector

Figure 4: Hydril Diamond Type Protector

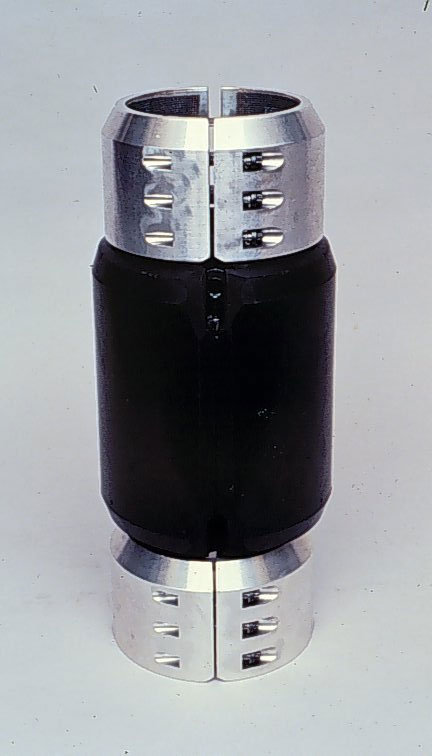
Western Well Tool Non Rotating Pipe Protector

Figure 5: Western Well Tool Non Rotating Pipe Protector

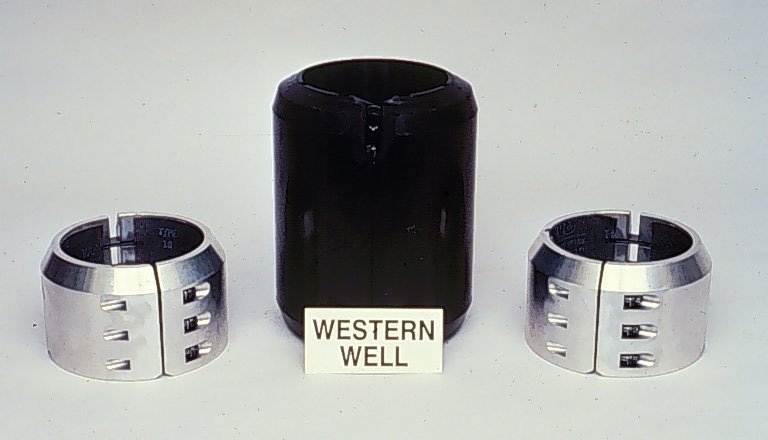
Western Well Tool developed such a `non rotating’ pipe protector which was quite successful. This unit, shown in Figure 5, consists of three pieces: Two end pieces which are clamped to the drill pipe, and a rubber center section which rotates between these end pieces. The end pieces provide low friction bearings upon which the center body rotates. These three pieces are shown in Figure 6.


Elements of Non Rotating Protector

Figure 6: Elements of Non Rotating Protector


Western Well Tool non rotating protectors have been used in several wells (that I know of) to remedy the excessive torque required to rotate the drill string.

Casing Wear Series - 10: Zero Casing Wear?

Although some of the proprietary hardbanding alloys can significantly reduce casing wear, there is only one material which we know of will spectacularly reduce the wear groove depth limit. What is this marvelous material?

Rubber!

Rubber? Yes, rubber. 70 durometer rubber.

This was discovered as a result of a casing wear test using a specially built pipe protector as a tool joint.

What we discovered was that the `wear groove’ was a `mirror finish’ strip where the wear groove should have been. This results from the fact that the rubber `tool joint’ polishes the inner wall of the casing instead of grinding it. The polishing mechanism is pictured in Figure 1.

The Mechanism of Polishing

Figure 1 - The Mechanism of Polishing

This is the same mechanism that has been used for centuries to polish optical elements.

The difference between grinding and polishing is that the abrasive particles imbed themselves into the pliable surface of the rubber (or pitch, beeswax, wood, paper, or felt) protector, and `shave’ very small elements of the casing surface. The pliable surface of the rubber tends to orient the abrasive particles rather than to give them an unyielding background against which to push into the casing surface, exceeding its yield, and fracturing the casing surface.

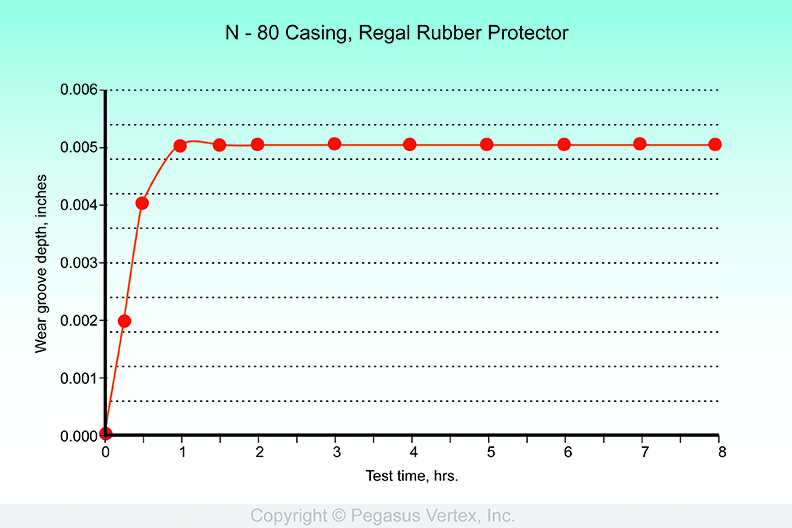
The extremely low casing wear using a rubber `tool joint’ is shown in Figure 2. This figure shows a plot of the casing wear data from an 8-hour test in which the steel tool joint is replaced with a rubber pipe protector. The casing wear groove rapidly reaches a depth limit of 0.005 inch, and produces a mirror finish on the 0.653 inch wide wear groove.

Wear Test of Rubber Pipe Protector

Figure 2 - Wear Test of Rubber Pipe Protector

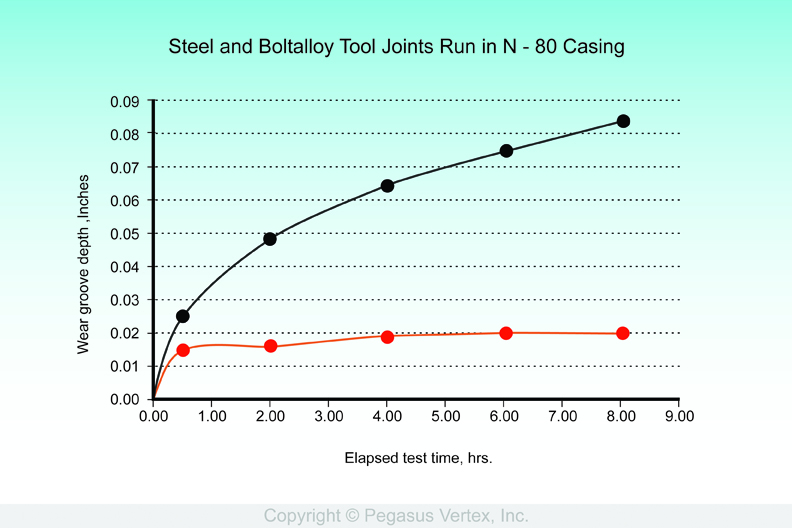
To put this into perspective, Figure 3 shows the results of three casing wear tests. These are all with N – 80 casing in a water-based mud containing 7 volume % Clemtex #5 sand. The upper plot of the figure is data using a steel tool joint. The second plot is data using a tool joint hardbanded with BOLTALLOY, and the bottom trace is data from the test using a rubber protector as a tool joint.

Steel Boltolloy and Rubber Tooljoint

Figure 3 - Steel, BOLTALLOY, and Rubber tool Joints

So why aren’t rubber pipe protectors routinely used to protect intermediate casing strings? They have a couple of limitations: (1) thermal and (2) chemical.

In Casing Wear Series - 11, we will talk about a few of the properties of rubber pipe protectors.

Casing Wear Series - 9: Contact Pressure Threshold (Part 2)

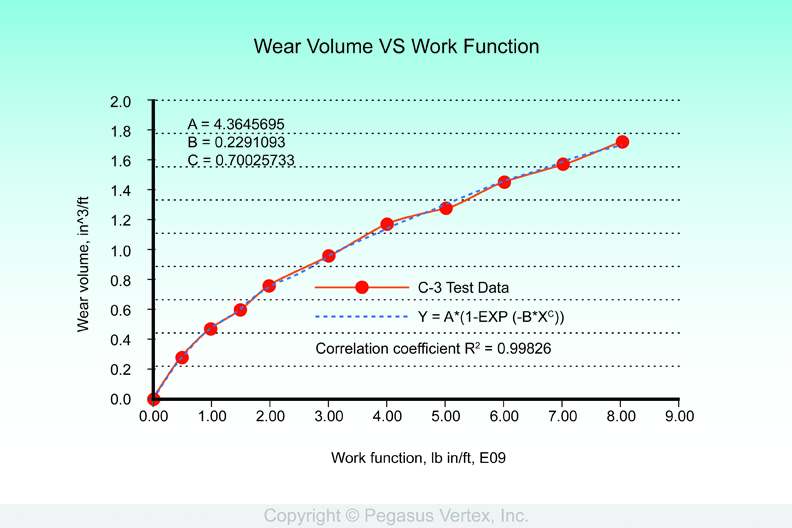
Contact pressure threshold can be demonstrated using a plot of casing wear test data such as that shown in the upper curve in Figure 1. First, the plot of wear groove depth vs. elapsed test time is transformed to a function of wear groove volume vs. work function, as is shown in Figure 1.

Figure 1: Wear Groove Volume vs. Work Function

Figure 1: Wear Groove Volume vs. Work Function

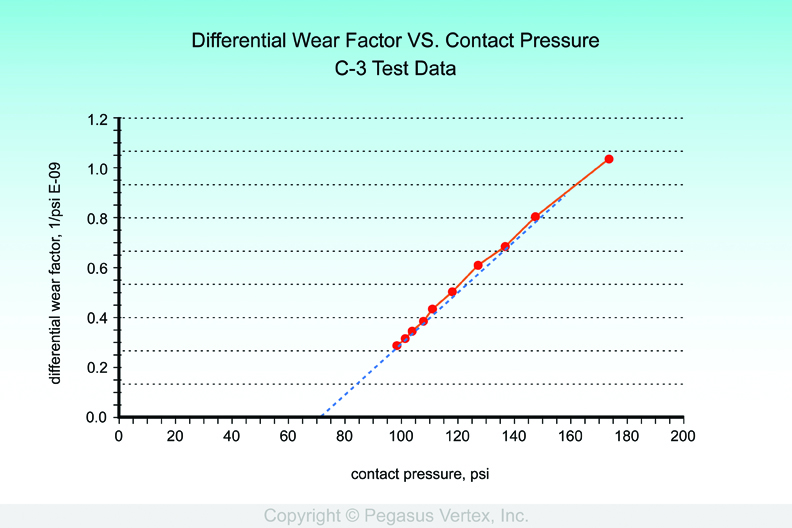
From the relation of wear groove volume vs. work function, the differential wear factor ( the slope of the curve shown in Figure 1) as a function of contact pressure, and shown in Figure 2, can be determined.

Figure 2: Differential Wear Factor vs. contact pressure.

Figure 2: Differential Wear Factor vs. contact pressure.

Figure 2 clearly shows that the differential wear factor, which is the rate of casing wear, intersects the horizontal axis at 70.8 psi., and is equal to zero for contact pressures less than this value. The value (70.8, 0) is the end of the curve, and not just its intersection with the horizontal axis.

The contact pressure threshold of any casing wear system can be determined from the casing wear test data and used to establish the wear groove depth limit for this same system where the geometry differs from that used in the casing wear test. Thus, wear groove depth limits can be estimated for field operations.

If the contact pressure threshold is less than 80 psi, the wear groove depth limit will probably be greater than the thickness of the casing wall. This is the case for most tool joint/casing/drilling fluid combinations.

Some of the proprietary hardbanding samples that have been tested against N –80 casing running in water based mud have exhibited contact pressure thresholds of as much as 200 psi. and wear groove depth limits, under test conditions, of 0.02 inches.

I have not seen quantitative field data confirming the results obtainable using proprietary hardbanding materials , but the continued sales of these products is an indication that the operators are convinced that they do significantly reduce casing wear.

Casing Wear Series - 8: Contact Pressure Threshold (Part 1)

If the casing wear groove depth limit is to be regarded as a `real world’ quantity, and not just a`mathematical peculiarity’, two things are required.

1. Experimental verification of the wear groove limit, and

2. A reasonable explanation for the existence of this casing wear groove depth limit.

An example showing (1) the existence of the casing wear groove depth limit and (2) the effect of tool joint hardbanding (Boltalloy) on casing wear depth is presented in Figure 1.

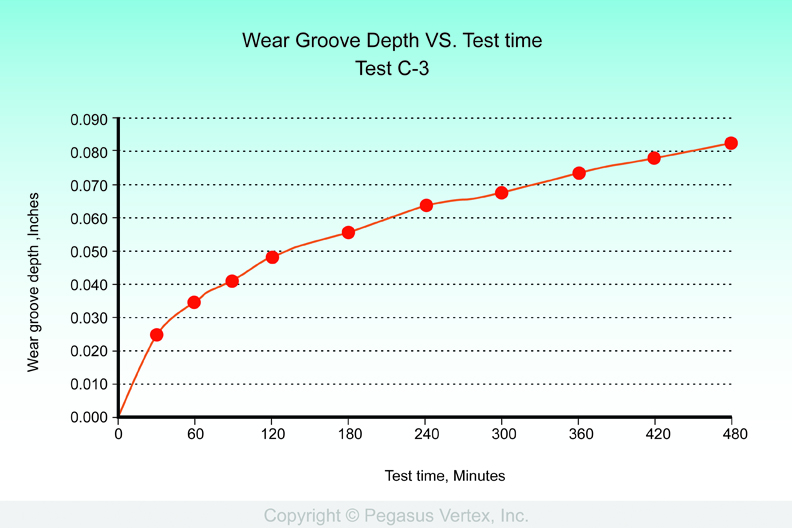
The upper curve represents the casing wear test data from Test # C – 3. In this test, the casing was 9 5/8 inch, 47 ppf N – 80: The tool joint was fabricated from AISI 4145 steel: and the drilling fluid was a 10 ppg. Water based mud containing 7 volume % Clemtex # 5 sand. The casing wear groove depth at the end of this 8 hour test was 0.081 inches.

The lower plot, labeled `BOLTALLOY’ , represents test data from a system which differs from that of the C – 3 test only in the metallurgy of the tool joint. The tool joint was hardbanded with a proprietary alloy. The depth of the casing wear groove was 0.02 inches at the end of this 8 hour casing wear test.

Use of the proprietary hardbanding reduced the casing wear groove depth in the N – 80 casing to a maximum depth limit of 0.02 inch. This is in contrast to the 0.1739 depth limit predicted for the N – 80 casing in the presence of the unhardbanded AISI 4145 steel tool joint.

The time required to reach 90 % of the wear groove depth limit for the BOLTALLOY test was 1.56 hours.

These results are similar to many other results that have been obtained during the DEA 42 Casing Wear Program, and they confirm the existence of the casing wear groove limit. It is a physical reality.

Casing Wear Depth Limit

Figure 1: Casing Wear Depth Limit

NOTE: Observations and conclusions regarding the performance of casing wear systems (which consist of (1) casing, (2) tool joint, (3) drilling fluid, and (4) operating conditions) are based on mathematical analyses of the statistical curve fit to the casing wear test data.

Casing Wear Series - 7: Casing Wear Groove Depth Limit

Plotting the depth of the casing wear groove during the 8 hour casing wear test results in a plot as shown in Figure 1. These results are from casing wear test C-3. In this test, the casing sample was a piece of 9 5/8 inch, 47 lb/ft, N-80 casing. The tool joint was fabricated from AISI 4145 steel. And the drilling fluid was a 10 ppg, water-based mud containing 7 % by volume Clemtex #5 sand.

Figure 1: Wear groove depth vs. elapsed test time plot

Figure 1: Wear groove depth vs. elapsed test time plot

This plot is a description of the performance of a casing wear system under the particular set of operating conditions imposed during the casing wear test. It describes the performance of the casing wear system under the operating conditions of the casing wear test. It does not explain anything!

An empirical curve fit to this data, which is the best representative of all 450 or so casing wear tests, is a function, shown in Equation 1, which is primarily exponential with a bit of a power law element added.

Equation 1

Equation 1

Where h = wear groove depth, inches

D, E, and F are all positive constants determined by the least squares fit to the test data.

t = elapsed test time, hours.

There is a very important and significant consequence of this result: As time, t, increases, the wear depth, h, approaches asymptotically the value D.

The Wear groove depth does not increase beyond D.

And the test time, t90, required to achieve 90% of this wear depth limit is given by Equation 2.

Equation 2

Equation 2

For test C-3, D, (the wear groove depth limit) = 0.17154 inches, and t90, (the test time required to reach 90% of this depth limit) = 98.32 hours.

In those cases where D, the casing wear depth limit, is greater than the wall thickness of the casing, (0.472 inch for the casing sample in test # C-3 ), it can be assumed that the casing wear groove depth will easily reduce casing wall thickness below which required to maintain adequate burst resistance.

But, if a tool joint hardbanding material can be found for which the value of D from the test data is on the order of 0.02 to 0.03 inch, you have a valuable discovery.

Before marketing any such discovery, hardbanding wear rate, initial cost, and replacement cost must all be evaluated. Economics is a major factor in the development and application of casing friendly devices.

If such small casing wear groove depth limits are a physical reality, the wear depth limit can be a more important property of a hardbanding material than the wear factor, which is based on the wear volume determined at the end of an 8 hour laboratory test.

We need to determine if this concept is real or just a mathematical peculiarity of the statistical curve fit procedure.

This will be our next discussion topic.

Casing Wear Series - 6: Some Pictures

Not many examples of casing wear are retrieved from field operations. Pulling casing is expensive, and if the damage can be nullified by running and cementing an intermediate casing liner, rather than pulling the damaged string, that will probably be done. As ever, if there are two possible solutions to a field operational problem, the least expensive one will be implemented.

Figure 1: Burst Liner

Figure 1: Burst Liner

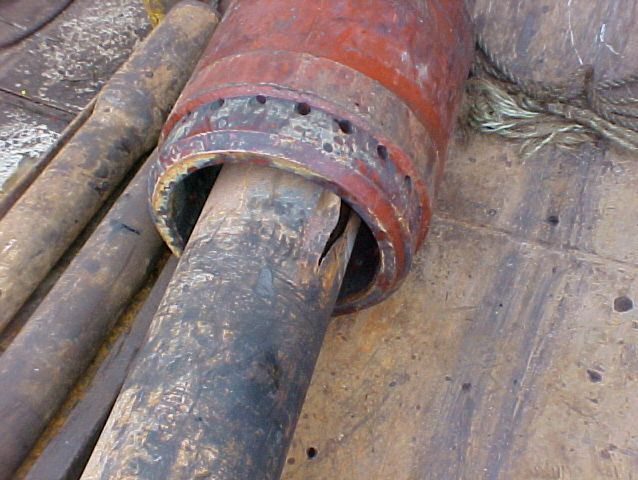
Figure 1 shows a typical liner failure. Wear is greatest at the top of the liner, and decreases as you progress downward. If wear continues long enough, the liner wall thickness is reduced to the point where the burst strength of the thinned wall is less than the internal pressure. The resulting burst is a tapered opening, largest at the top of the liner, tapering downward.

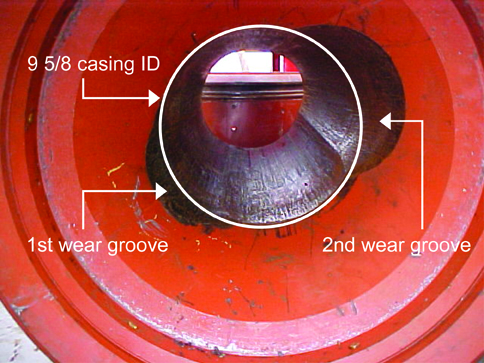
Figure 2 shows two wear grooves in a liner hanger wear bushing. After inspection revealed the first wear groove, the bushing was rotated 180 degrees before being reinstalled, thus resulting in the formation of the second wear groove.

Casing or riser wear occurs where the borehole either changes direction (dogleg or a flex joint) or diameter (top of a liner).

Dogleg severity can be determined from a directional survey of the well. With dogleg severity and drillstring tension, the lateral load on the casing can be calculated. This allows casing wear as a function of well depth to be calculated.

Where we deal with a change of well diameter - such as at the top of a liner - we have no reliable way to calculate lateral load. Therefore, we assume the worst and install wear bushings at the top of liners.

Figure 2 demonstrates the value of a wear bushing. Better the bushing should wear, rather than the top of the liner hanger.

Figure 2: Wear Groove in Liner Hanger

Figure 2: Wear Groove in Liner Hanger


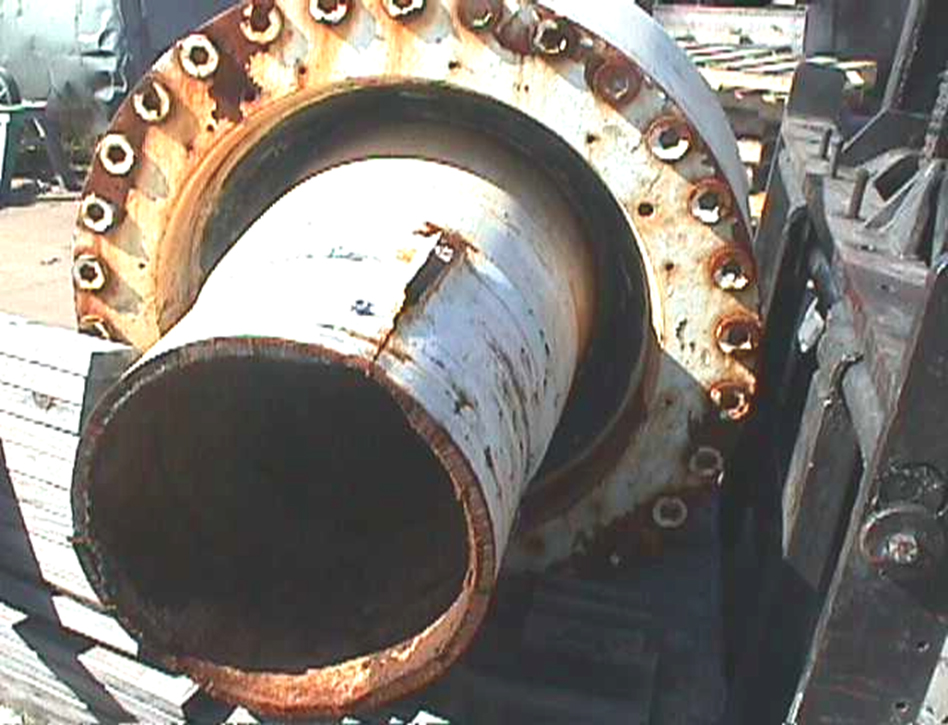
Figure 3 shows the split resulting from burst failure at the top of a flex joint. This failure occurred in a section weakened by internal wear. Internal view of this split is shown in Figure 4.

Figure 3: Split at the top of Flex Joint

Figure 3: Split at the top of Flex Joint

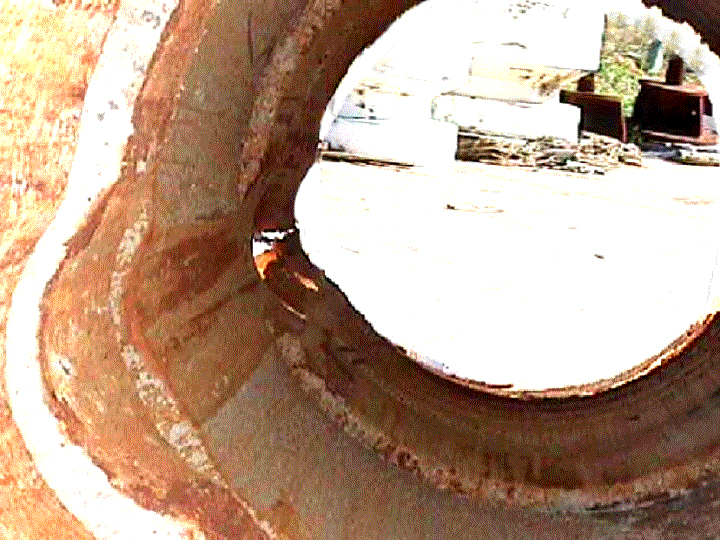
Figure 4 is a view of the split shown in Figure 3, looking from the inside out.

Figure 4: Another View of the Failed Flex Joint

Figure 4: Another View of the Failed Flex Joint

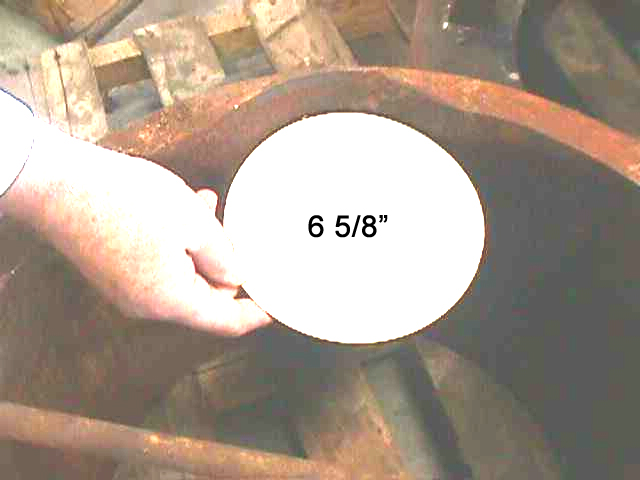
Figure 5: Wear Groove in Upper Element of Flex Joint

Figure 5: Wear Groove in Upper Element of Flex Joint