Casing Wear Series - 9: Contact Pressure Threshold (Part 2)

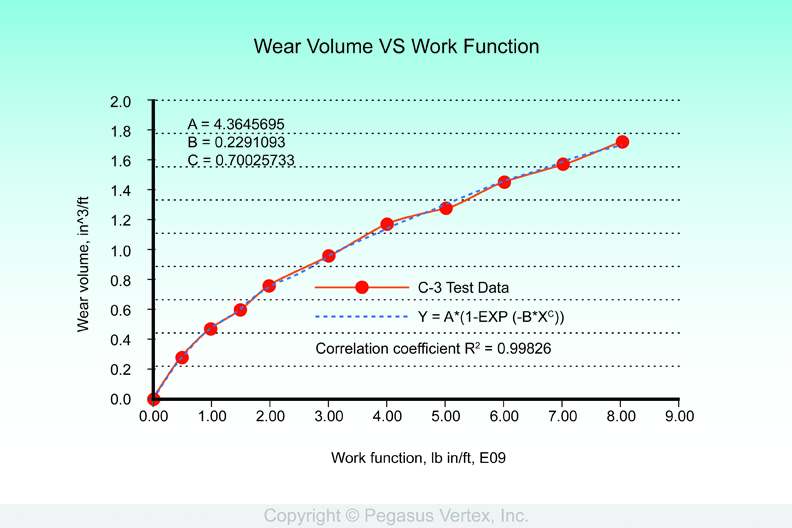
Contact pressure threshold can be demonstrated using a plot of casing wear test data such as that shown in the upper curve in Figure 1. First, the plot of wear groove depth vs. elapsed test time is transformed to a function of wear groove volume vs. work function, as is shown in Figure 1.

Figure 1: Wear Groove Volume vs. Work Function

Figure 1: Wear Groove Volume vs. Work Function

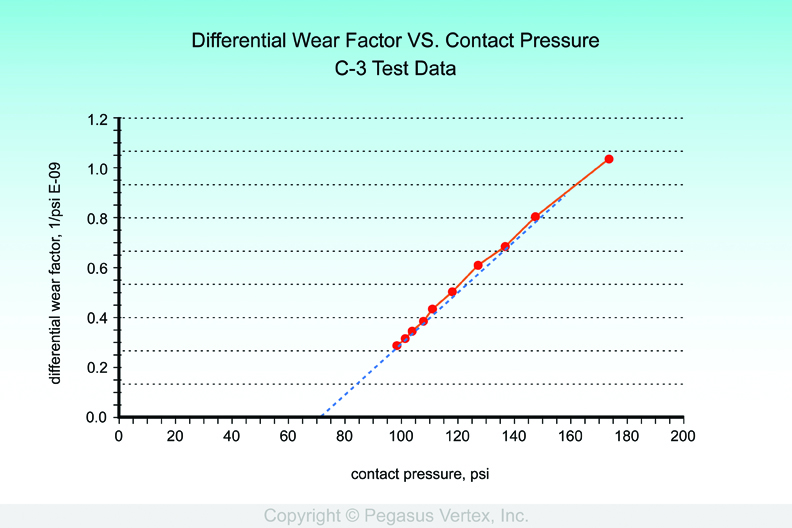
From the relation of wear groove volume vs. work function, the differential wear factor ( the slope of the curve shown in Figure 1) as a function of contact pressure, and shown in Figure 2, can be determined.

Figure 2: Differential Wear Factor vs. contact pressure.

Figure 2: Differential Wear Factor vs. contact pressure.

Figure 2 clearly shows that the differential wear factor, which is the rate of casing wear, intersects the horizontal axis at 70.8 psi., and is equal to zero for contact pressures less than this value. The value (70.8, 0) is the end of the curve, and not just its intersection with the horizontal axis.

The contact pressure threshold of any casing wear system can be determined from the casing wear test data and used to establish the wear groove depth limit for this same system where the geometry differs from that used in the casing wear test. Thus, wear groove depth limits can be estimated for field operations.

If the contact pressure threshold is less than 80 psi, the wear groove depth limit will probably be greater than the thickness of the casing wall. This is the case for most tool joint/casing/drilling fluid combinations.

Some of the proprietary hardbanding samples that have been tested against N –80 casing running in water based mud have exhibited contact pressure thresholds of as much as 200 psi. and wear groove depth limits, under test conditions, of 0.02 inches.

I have not seen quantitative field data confirming the results obtainable using proprietary hardbanding materials , but the continued sales of these products is an indication that the operators are convinced that they do significantly reduce casing wear.

Casing Wear Series - 8: Contact Pressure Threshold (Part 1)

If the casing wear groove depth limit is to be regarded as a `real world’ quantity, and not just a`mathematical peculiarity’, two things are required.

1. Experimental verification of the wear groove limit, and

2. A reasonable explanation for the existence of this casing wear groove depth limit.

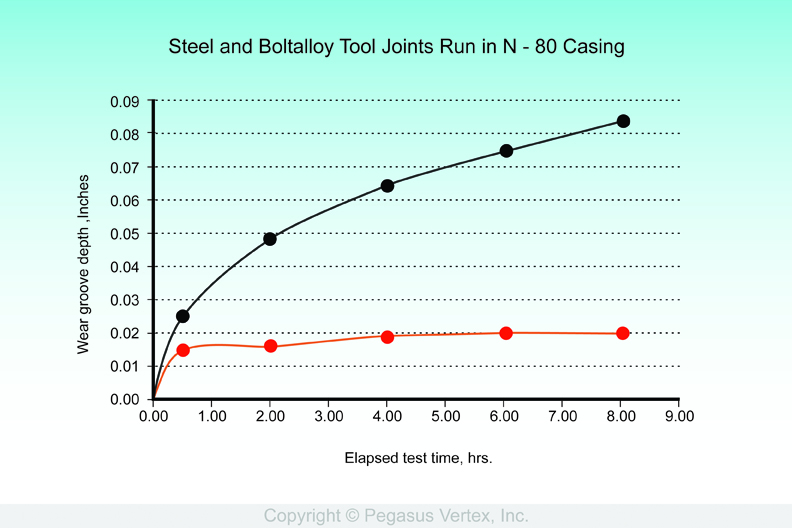
An example showing (1) the existence of the casing wear groove depth limit and (2) the effect of tool joint hardbanding (Boltalloy) on casing wear depth is presented in Figure 1.

The upper curve represents the casing wear test data from Test # C – 3. In this test, the casing was 9 5/8 inch, 47 ppf N – 80: The tool joint was fabricated from AISI 4145 steel: and the drilling fluid was a 10 ppg. Water based mud containing 7 volume % Clemtex # 5 sand. The casing wear groove depth at the end of this 8 hour test was 0.081 inches.

The lower plot, labeled `BOLTALLOY’ , represents test data from a system which differs from that of the C – 3 test only in the metallurgy of the tool joint. The tool joint was hardbanded with a proprietary alloy. The depth of the casing wear groove was 0.02 inches at the end of this 8 hour casing wear test.

Use of the proprietary hardbanding reduced the casing wear groove depth in the N – 80 casing to a maximum depth limit of 0.02 inch. This is in contrast to the 0.1739 depth limit predicted for the N – 80 casing in the presence of the unhardbanded AISI 4145 steel tool joint.

The time required to reach 90 % of the wear groove depth limit for the BOLTALLOY test was 1.56 hours.

These results are similar to many other results that have been obtained during the DEA 42 Casing Wear Program, and they confirm the existence of the casing wear groove limit. It is a physical reality.

Casing Wear Depth Limit

Figure 1: Casing Wear Depth Limit

NOTE: Observations and conclusions regarding the performance of casing wear systems (which consist of (1) casing, (2) tool joint, (3) drilling fluid, and (4) operating conditions) are based on mathematical analyses of the statistical curve fit to the casing wear test data.